
Hello. I’m a new rider who recently purchased a ten year old bike. I have ZERO mechanical know how, but decided that I wanted to learn.
So far I managed to take both the front and rear wheels off to get the tires changed and I managed to change the oil. Since I am unskilled, it took a LOT of fumbling through these to get things going…including breaking some nuts (rear axle nut was stuck and I originally only had a 12 point socket) and bolts (overtorqued an oil filter cover bolt despite using a torque wrench) and buying replacement ones.
Since the bike is 10 years old, I know that all of the fluids need to be changed. I feel comfortable attempting the actual change for the brake fluid from my research EXCEPT I don’t want to irreparably damage this area. The front brake works fine, but the sight glass is totally clouded and opaque, so I cannot visually check the condition or level of the fluid.
These are JIS screws and I have purchased replacement screws. Any advice here? Please consider my novice skill level lol.
I bought some screw extractor bits but do not have an impact driver. I have some JIS screwdrivers, a hammer, a regular drill, penetrating oil, and replacement JIS screws.
Thanks!
TL;DR: Just drill these out.
Don’t waste your time with screw extractors, new screwdrivers, torches, or any of that.
This always happens with these Japanese style master cylinder covers. The reservoir body and cap are aluminum and the screws are plain steel. You can do the math there easily; you wind up with galvanic corrosion due to the dissimilar metals and they seize.
I don’t know how many dozen of these I’ve had to do over the years. Maybe hundreds. Grab a drill bit just a touch larger than the shanks of the screws (which are typically 4mm) and just drill down right in the center of the screw head. Then the head of the screw will pop off. Stop there.
Once both screw heads are drilled off the cap will come off easily. Then you can unscrew the left over stumps of the screws (conveniently sticking out, thanks to the thickness of the cap) with your fingers. The screw head binding against the surface is what keeps tension on the threads. One the head is drilled off the threaded stumps will just be loose. Fortunately in this case, the reservoir cap is sealed (or ought to be…) and thus moisture can’t get in to rust the threads; only the head.
Don’t replace these with OEM screws. I mean, you can temporarily since you already have them and you’re going to have to use something. But trust me on this, replace them with stainless steel metric M4x0.7 screws, 12 to 14mm length is usually about right, preferably with Allen heads. That way when you have to get in there next season you won’t have to go through this whole song and dance again.
And go slow while doing this, you can’t undrill a hole.
And you need the shanks to stick out of their holes to grab onto them.
Take a rubber band and place it over the screw and then try to back it out. That works more than 75% of the time. These look pretty stripped so this trick might not work.


More pics
A standard drill should work for the screw extractors, but that depends on what kind you bought, I suppose.
A last resort, and pending any other suggestions, you could drill off the heads of the screws, lift the cover off and then use a locking wrench to twist out the remaining “posts” of the screws that are left. This is a pain in the ass in its own right and you risk cracking or damaging the plastic cover.
Edit: Just wanted to add another risk to drilling the heads off. If the screws happen to be brittle, you also risk snapping off the bit of “post” that is left and leaving yourself with a screw that you can’t extract easily. NGL, screw/bolt extraction can go wrong really fast if you don’t take your time or are just unlucky.
On that note, I just thought of two different methods that are in the same family… If the component allows for a little bit of force, you may be able to hammer a screwdriver into the head giving you just enough bite to turn the screw. (This will either break any corrosion or damage the threads of the screw.) Also, while it probably won’t work for this particular case, cutting a new slot in the screw head (using a file or a Dremel tool) may work to use a flathead screwdriver to extract.
In all of the above solutions, the theme is the similar: Don’t let the constraints of the original tool design interfere with brute force. You just need to either make the screw irrelevant (destroy it) or think of a creative way to turn the damn thing.
Following up on everyone else’s advice: if the threads in the cylinder get messed up, a new brake master is less hassle than trying to repair those with a helicoil, and probably not very expensive, too.
Edit: oh yeah, you don’t want to take that to a shop. Lots of shops won’t take something even just that old, and independents can be hit or miss on quality, since they know they don’t have many competitors.
Probably least hassle.
Also, fuck JIS and Phillips head screws
Robertson or death!
Torx has entered the chat
Well my main concern is that I don’t want to fuck up the master cylinder lol. Looks like it’s over a hundred USD and it’ll be more hassle and things I don’t know what I’m doing. It’s actually why I had been leaning towards taking it to a shop (so I don’t damage the cylinder) rather than myself. I don’t even know if the screws themselves are seized or not.
Year make model? I bet i can find one cheaper than $100. Changing a brake master is pretty easy: remove, replace, fill, bleed. I can walk you through it.
It’s a 2017 Honda Rebel 300 (non ABS). The part number seems to be 45510-K87-A01.
When googling, I do see some websites that sell it for cheaper, but idk how much I can trust these random sellers I have never heard of lol. More also that I don’t want to keep being out for riding for so long! It took me several weeks to get parts together to get the tires replaced. I’m a new rider and want to be able to practice haha!
Okay, best I could do is get a used one off ebay for ~$50 and a rebuild kit for ~$30. If necessary, that’s the route I’d go myself.
try tapping your screwdriver into the screws with a hammer, or drilling out a shallow hole in the middle of the stripped screw before tapping in the screwdriver, then push down on the screw driver while slowly unscrewing it.
I’ve done the hammer tapping thing before and it worked so I would try that first. If it doesn’t work, yeah, it might be time for a mechanic, they deal with stripped screws a lot and they can always bore out the entire thing and then secure it with a new bolt and nut from the other side.
Take a 3/16ths drill bit to the screw heads until they come off. Then you can remove the cover, and there will be a little bit of the screw sticking up. You can grab that with pliers and spin the rest of it out. It’s not as bad as it looks, I work on older powersports equipment and have to do this about once a week.
↑
An upvote here for the other cat who knows where it’s at.
I would definitely go straight to an extractor, but be very careful. If you drill too far you’ll be making a much bigger problem.
Please try an impact screwdriver before anything destructive.
Worst case scenario you already have a hammer …
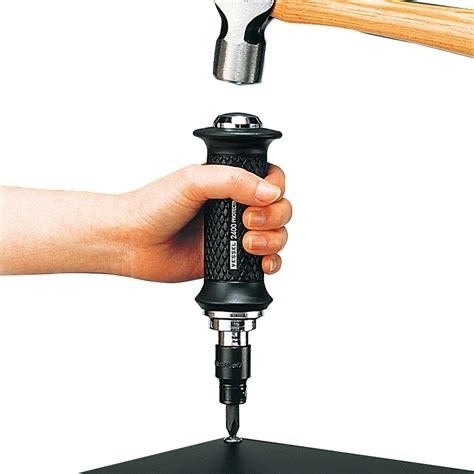
It might be worth trying to borrow an impact, they can be magic in situations like this. I distinctively remember struggling to remove some stripped out screws holding a set of bindings to a ski. I tried all the tricks, rubber band, tapping with a hammer, all to no avail. I was about ready to attempt drilling it out when a friend who saw me struggling walked up with his little impact driver. VCKCKRRRRRRRRCK. VCKCKCKRRRRRRRRCK. They came out like nothing